
One of the most rewarding ways of saving money has to be learning to bake your own bread. However for many the process can seem overwhelming – critical points like the temperature of the water, what’s the correct technique to knead the dough, how long to knead the dough, all of these things are enough to send the novice baker back to the supermarket for a wrapped loaf of mass produced factory bread!
It’s a real shame as homemade crusty bread is so much better than anything you can buy encased in plastic and it is cheaper too at around half the price of the average wrapped loaf.
But sometimes, no matter how enthusiastic you are, reading books on how to make great bread at home, although inspiring, can make the whole procedure seem more like a science lesson than something fun to do on a Saturday afternoon in your kitchen.
Chefs and artisan bread makers will give you formulas and techniques to make super wet doughs and long fermenting times for full flavour but for an everyday white crusty loaf, like you used to buy from the baker, perfect for your Sunday morning bacon butty, the whole process is simple and straightforward. It’s a great activity to do with kids as well because, unlike pastry, the dough cannot be overworked.
So I want to encourage anyone who thinks they cannot make bread or hates the thought of all that wet sloppy dough sticking to their fingers to grab their stand mixer and try this recipe for tasty, fresh crusty bread – your taste buds and your family will love you for it!
If you prefer to measure the water in ml rather than grams then the measurement is the same, so 325g water is also 325ml of water but weighing out the liquid in grams is much more accurate
Products We recommend:
(Contains affiliate links)


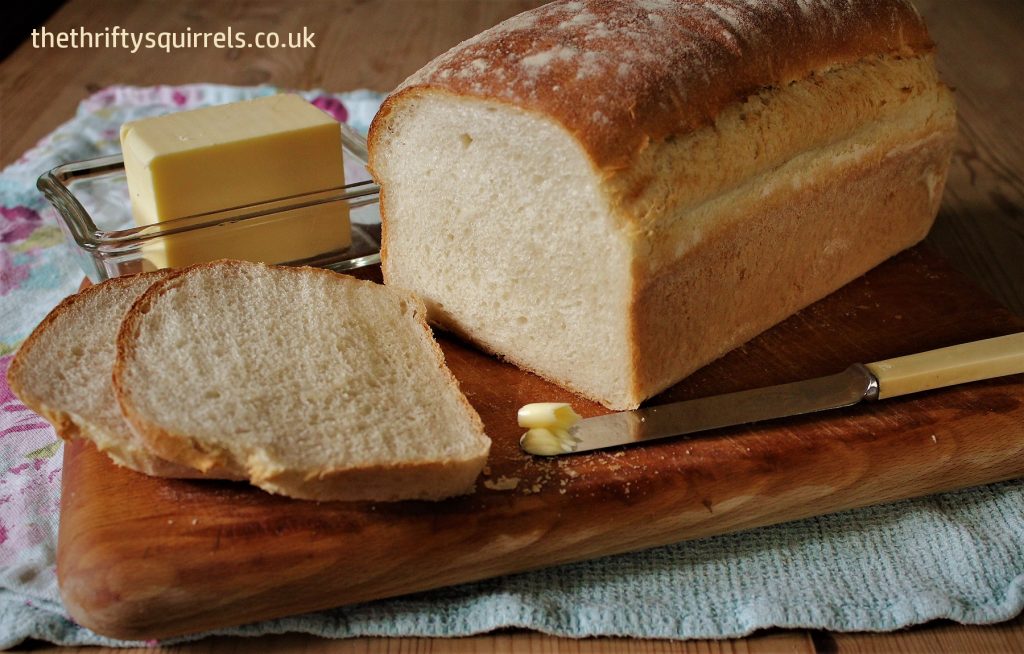
Making Delicious Homemade Crusty Bread
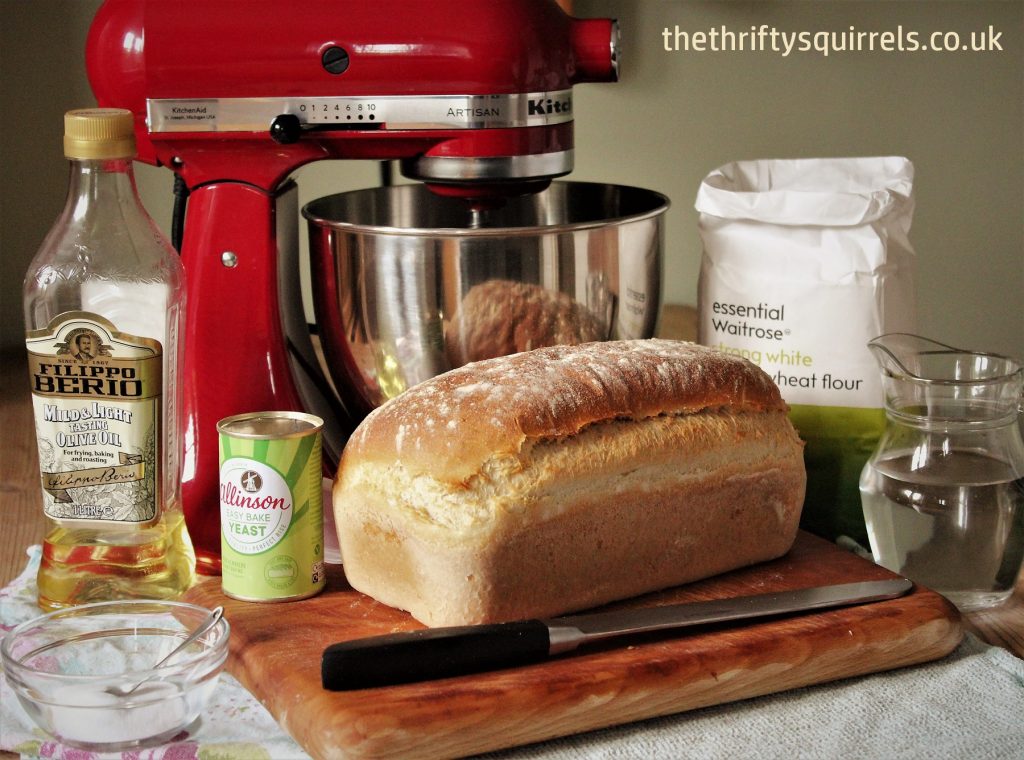
Ingredients
325 grams (or 325 ml) warm water – just pleasantly warm when you put your finger in it…not too hot
10 grams salt
15 grams (or 15ml = 1 tablespoon) vegetable oil
500 grams strong white bread flour
7 grams fast action yeast
Equipment
Stand mixer with a dough hook – we use a Kenwood Chef, but also have a Kitchen Aid, both give excellent results!
Digital Scales – for consistent results and ease of measuring the ingredients
Tea towel or muslin
A 2lb loaf tin – metal is so much better than silicone!
Method
Into the stand mixer’s bowl first add the 325g of warm water.
Next add the salt and the oil to the water then the 500g of bread flour.
Finally sprinkle the yeast on top of the flour and very gently, using your fingertips just mix the yeast lightly into the flour to distribute it evenly.
Now using the dough hook, mix on the lowest speed until a dough is formed then turn up the speed to the next level (no.1) and let the mixer do all of the hard work kneading the dough for 10 minutes.
When the 10 minutes is up, tip the dough out and shape into a neat ball. Place the dough back into the bowl and cover with a damp cloth – a tea towel or similar (I use a piece of muslin) – and leave in a warm, draught free place for about an hour until the dough has doubled in size. If the room is cool this may take a bit longer.
I the meantime, grab your tin that you will be baking the bread in and use a pastry brush to lightly oil the inside then coat thoroughly with flour, turning the tin upside down and giving it a sharp tap to remove the excess.
When the dough is ready, turn it out onto a lightly floured surface and knead gently for only a few seconds to knock it back – this is done to remove the large air bubbles that have formed and you will get a lovely even texture to your finished bread.
Now to shape the dough ready to go into the tin you need to flatten it into a rectangle with your fingers so that the shortest edge is as wide as the length of the tin you are using. Now the dough is rolled so take the edge of the dough nearest to you (the shorter edge) and fold it into the middle, pressing the edge down to seal it in the middle of the dough then continue to roll the dough so that the seam is underneath and you have a sausage shape.
Place the dough into the tin and cover with the damp cloth then leave to rise again until doubled in size. This usually takes about 1 to 1 ½ hours.
Preheat your oven to 220°c fan / 240°c /475°f / gas 9 and, when its ready, bake your bread just below the middle of the oven for 30 minutes.
Keep an eye on the crust to make sure it doesn’t brown too much for taste. If it is looking a little dark then reduce the heat. As soon as it is cooked, remove from the tin and cool on a wire rack.
The beauty of making your everyday bread this way is that it takes very little hands on time – while its rising you can easily leave it all alone and go off and do something exciting!
You can also make homemade bread rolls with your stand mixer too! Try our recipe for Everyday Bread Rolls and enjoy them with your favourite dishes – they are really great with casseroles such as our delicious Pork Casserole, which is gently warmed with mild curry spice!
Please, if you love good bread, give this a go and let me know how you get on. If you have any questions, pop them in the comments below.
Thank you for your bread recipe. I have had mixed results previously over the years and so bought a bread-maker. After having to dig the paddle out of the bread in the last two machines I looked for an easy recipe to try in my new stand mixer. Fortunately I came across yours. At this moment I have a beautifully risen loaf cooling in my kitchen.
Thank you for the recipe. I would love to know if you have any more bread ideas in the pipe-line
Regards
Christine
Hi Christine, thanks so much for your message, I’m so glad the bread recipe has worked well for you and I hope you enjoy that first delicious slice (still slightly warm!).
I haven’t been posting much on The Thrifty Squirrels for a while now due to other commitments and interests but I’ve been learning new skills (like photography) and I am currently making plans to revive The Thrifty Squirrels with new recipes and other content.
I do have some more bread recipes that I will post soon, so I do hope you will enjoy those when they are published
Donna x
This crusty homemade bread looks amazing, I love how using a stand mixer makes the process so much easier, while still getting that perfect, crispy crust. The step-by-step instructions are super helpful, and the result looks just like something you’d find at a bakery. I can’t wait to give this a try—thanks for sharing such a straightforward and delicious recipe.
I have rheumatoid arthritis and my hands aren’t up to kneading dough by hand anymore, so I was pleased to find your recipe to make everyday bread using a stand mixer.
And I am absolutely delighted with the result – one beautifully risen and gorgeous smelling loaf made.
It’s such a clear reciipe and easy to follow.
Now I will have to try the wholemeal version.
Many thanks for sharing this lovely recipe.
Hi Gillian, thanks so much for taking the time to leave your comment, it really does give us a real boost to hear that our recipes are successful for so many people!
My mum had rheumatoid arthritis too so I know how restricting it can be.
We’ve lots going on here at the moment but I’m hoping to be able to upload many more recipes soon.
Donna x
We’d tried making bread before with a bread maker but didn’t really like the results and the bread was always too sweet for my taste, no matter what adjustments we made. Thought I’d give this a try as it seemed so simple and am blown away by the results. First attempt was OK but a bit salty and had more of a ciabatta-like texture. Still better than the bread machine managed though. For the second try, I invested in a good set of digital scales and made a perfect loaf. I’ve made it in a loaf tin and also in a cast iron pot, both came out beautifully. I can’t thank you enough for sharing this recipe, absolute gamechanger!
Hi Christina, thanks so much for taking the time to leave your comment – it’s always a great boost to hear that the recipes are working well!
I’m so pleased that you have now conquered homemade bread – there’s no turning back now 😅
I have made bread before but this was so much better. I think that using the ingredients in your order is a great improvement. I used wholemeal/white strong flour in 3:2 ratio as my hubby is diabetic and is trying to eat a bit healthier. Thanks for the recipe, I will certainly bookmark you and use this again.
Hi Sue, I’m so pleased to hear that our bread recipe is a success for you!
Brian is diabetic too and knowing what goes into our everyday loaf is very reassuring.
If you would like to make a pure wholemeal loaf as quickly and easily as this white bread recipe, you can follow the same instructions with a few changes! Use 370g water, 7 grams salt, 10g vegetable oil and 12g easybake yeast – let your mixer run for an extra couple of minutes to thoroughly knead then leave the dough for just 30 minutes on the first proving, knock back, place in the tin and leave to rise as in the white bread recipe. Hope this is of use 😊
Donna
I made my first loaf of bread with this recipe ! Is really good 😁
Will definitely be making again and again, was so easy although I had to look up a video to get my head around the part where you prepare it to go in the Tin, read it over several times but could not understand, having watched a video I get what you are saying now and it all makes sense ☺️
Nice recipe thank you 🙏🏻
Hi Hurman, thanks so much for your comment – it’s really great (and encouraging!) to hear that our readers are enjoying our recipes 😊
So pleased that the bread has turned out well – fresh and crusty from the oven, it’s a real treat isn’t it!
Donna
I discovered this recipe by accident and I have to say I’m happy I did. I make this bread all the time and every time it turns it great. Thanks for sharing 😀
Hi Ann,
Thanks so much for taking the time to leave a comment – it is very much appreciated 😊
I’m so happy to hear that our recipe is such a success for you and that you are enjoying making fresh crusty bread at home!
Donna
Love this recipe – works every time! Will try the whole meal next
Hi Dave, thanks so much, I’m so pleased that you enjoy our recipe 😁 and thanks for the mention and link on your great blog!
I made this a couple of days ago , husband loves it. He has a sweet tooth so asked me to try adding some fruit. I pre soaked some sultanas & added some lemon zest. Absolutely delicious. Will be a regular bake in this household. Thanks for great recipe.
Hi Monica, I’m so pleased to hear that our bread recipe is a success for you and thanks so much for this idea, it sounds so nice I’ll definitely be giving it a go!
Made this today and replaced about 80g of the flour with light rye flour, worked really well and gave a slight nutty flavour. Hubby usually makes bread with a breadmaker which was on its last legs. Great to find an easy recipe using the stand mixer.
That’s a really great idea and a good way to add extra flavour to your loaf!
I’m really pleased that you have found our recipe useful…and I’m going to give your version a try!
Donna
I’m on my fifth or sixth loaf, each one improving on the last, but today I nailed it! Thing is, I should have paid more attention to the instructions about the dough doubling in size & less to times in both risings as today the first rise was about 40 minutes & the second the same. Trying to not over prove I stopped there and baked it, getting the best rise yet. So happy! Ploughman’s for lunch with chunks of gorgeously risen bread. Thank you for a terrific recipe. Gil the happy baker at last x
Hi Gil, it’s great when it all comes together isn’t it!! Well done – now that you’ve cracked it freshly baked bread will become second nature and so preferable to any mass produced supermarket loaf!
Thanks for taking the time to leave a comment, it is very much appreciated 😊
Donna
I havemade thus bread many many times. I will never buy bread again. I’m trying to lose some “lockdown” weight, but can’t find how many calories there are in the bread…….could you kindly let me know.
Hi Kris,
I’m so pleased to hear that out bread recipe is such a success for you!
I’ve done a calculation on how many calories are in our white bread and the whole loaf comes in at 1932 kcals, so if you get say 12 slices from each loaf then you are looking at 161 kcals per slice. Bread can be a bit of a killer on the calorie front unfortunately.
I’m with you with losing a few pounds now that lockdown is coming to an end. I’m doing it by calorie counting (1400 kcals per day) and logging everything I eat in My Fitness Pal to make things easier to keep on track!
Good luck with your weight loss 😊
Donna
I’ve made this loaf several times now and 100% success. Kids love it but they’re teenagers and would eat almost anything and everything but this they love. Trying the same recipe as rolls today to see how they turn out. I use Aldi strong white flour and their sachet yeast so it really is as cheap as chips. I think I costed the loaf at under 30p plus baking time plus I know exactly what is in it. Than you.
Hi Graham, thanks for taking the time to leave a comment 😊
It’s great to hear that you are having great success with our recipe for Homemade Crusty Bread, it sounds like your teenagers will be keeping you busy making lots of loaves!
The recipe works great as rolls too, we often make them and eat warm from the oven with dinner – nothing like it. We like them quite large so usually make about 10 from this recipe
Donna
I much prefer brown or wholemeal bread. What changes would you make if you were using say a granary flour?
I’m moving from a bread maker to a mixer so this is sort of new to me.
Thanks
Colin
Hi Colin, thanks for your question 😊
Wholemeal bread is a bit trickier to master but still doable with practice!
Brown, wholemeal and granary flours can absorb more water than white flours so you may need to add more than stipulated in out crusty white bread recipe.
With the white bread we don’t add any extra sweetness to boost the yeast as it’s not needed but for wholemeal & granary loaves we like to add a teaspoon or so of malt extract. This gives the yeast a little extra food and adds a lovely flavour too.
We also have found that adding a little vitamin c powder makes a big difference so do try that if you can. You can use half a tablet, crushed and added in with the yeast or you can buy vitamin c powder from Dove’s Farm – it may seem a bit expensive but only
½ teaspoon is needed for a loaf of bread so it does go a long way!
Here’s a link to show you what I am referring to: https://amzn.to/2Mtm73V
For a lighter loaf you can cut out the first rise and just shape your dough and put it straight into a tin after mixing. These ensures that the yeast doesn’t run out of steam before it completes it’s proving and rising times.
We do this with our Easy Wholemeal Bread Recipe . This may be a good recipe to start with if you’re happy to include the extras of malt extract and vitamin c powder.
Finally, if you have a lot of trouble with a finished loaf that is heavier than you would like, you can do a mix of white and wholemeal flours. The white flour adds some lightness to the finished loaf and the more you add the lighter it will be! We often make a 50/50 mix of white and wholemeal for those that aren’t so keen on pure wholemeal!!
I hope this helps but do let me know if I can help any further and do let me know how it goes 😊
Donna
Do you have a similar recipe for wholemeal bread please, I love the white loaf but would like to try something different. Excellent recipe by the way thanks
Wendy x
Hi Wendy,
We do have a wholemeal bread recipe on the blog, which can be made using the stand mixer for the kneading, just use the same method as for the crusty white loaf.
The main difference with the wholemeal recipe is that it only has 1 rise. This is to make a light wholemeal loaf rather than one that is dense and chewy (which is often the case when making wholemeal bread at home!!)
You can also opt for a half-and-half approach, using half white bread flour and half wholemeal bread flour. This gives you the best of both worlds and can be made in exactly the same way as the crusty white loaf recipe. This can often be the best solution for a tasty wholemeal loaf that will have a similar texture to a white loaf.
Hope this helps!
Donna
Hi I don’t like using that much yeast, so on that amount of flour, i only use half a teaspoon. The bread seems to turn out well, (just takes longer to rise) but never as soft and fluffy looking as your pictures. Would that have any effect on the finished product or am I doing something else wrong?
Hi Sue,
Using less yeast has it’s good points! A longer fermenting time gives a better flavour and can improve keeping qualities but the resulting loaf is perhaps chewy rather than fluffy and has a different texture to the bread we make with more yeast.
The longer fermenting time allows the gluten to develop more and will lead to a denser texture – it’s a trade-off but I think you will be getting a better tasting loaf at the end of it!
If you don’t like to use too much yeast and would like to experiment a little, have a look for some artisan bread recipes that use a pre-ferment, such as a poolish or biga.
These are simply small amounts of flour, water and yeast – equal flour/water for a poolish and half water to flour for a biga plus a very small amount of yeast- so 100g flour, 100g water (or 50g for biga) plus 1/8th – 1/4 teaspoon yeast. This is mixed together and left to ferment for quite a few hours or overnight in a fridge. This is now the yeast element of your dough. Then its added to more flour, salt and water to make a normal dough and the process proceeds as normal.
Again, the texture probably won’t be fluffy but the flavour will be good – breads such as baguettes and ciabatta are made with this method.
Actually, I feel a little inspired to write a recipe for a pre-fermented loaf myself now!
Hope this helps in some way!
Donna
Thanks Donna. That’s very helpful. The bread definitely has a better flavour.
A recipe sounds great. I would love to try the other methods.
Thanks very much Donna. That is very helpful. The flavor of the bread is great. I have noticed a difference to when the dough has risen quickly. I would love to try one of those other breads … a recipe would be great!
Take care and keep safe
Hi Donna
Thank you for your help. I have reduced the proving time , one hour each prove. I made the best loaf ever last week ,today’s is good ,not quite as good as last time ! but I think maybe I’ll prove it in a different place next time as the airing cupboard is maybe too warm. I’ve not bought any bread now for months so am very pleased.
Pat
Hi Pat,
I always leave my bread to prove in the kitchen when I’m cooking, otherwise I move it to the coffee table in the living room when that’s the warmer room – with the added benefit of being able to keep an eye on it and not forget it so that it overproves, which has happened more times than I’d care to admit to!!
The thing with making bread though is that it’s a living thing and any variables, such as ambient room temperature, the temperature of the dough, proving times etc. need to work together to make the bread. If any one of those changes even slightly, it has an impact and something else needs to be modified to get the same result.
In reality, experience plays a very big part and helps to hone skills so you can gauge when the dough has risen just enough and the perfect point at which to get it into the oven! You bread will just keep getting better 😉
Like you, I no longer buy bread – I really would rather go without than eat what passes for bread in supermarkets these days!!
Hi, been making bread every few days following your instructions …delicious. However, the last 2 loaves have looked great following second rise ( in airing cupboard now as kitchen cooler now ) but after dusting with flour and putting in oven ,it flattens on top …looks like Table Mountain. ! Still delicious but what am I doing wrong ?
Hope you can help. Many thanks
Hi Pat, I’m pleased to hear that you’ve been enjoying your freshly made bread!
With the tops of the loaves flattening when baking, it sounds like the yeast has run out of steam and hasn’t enough strength left for the last ‘oven rise’. This could possibly be because it may have slightly over proved. As temperatures change in our houses, it affects the rising time of the dough so as you have said, putting it in the airing cupboard in a nice warm place, this will accelerate the dough to work faster therefore leading to the yeast becoming exhausted!
With bread, the slower the rise, the better the flavour and texture so if you can allow the yeast some extra time in your kitchen to rise, it should still work perfectly. But if you would still like to put the dough into your airing cupboard to quicken things up, slightly less rising times should give enough leeway for the yeast to still have some energy left for the final oven rise and giving you a nice rounded crust.
Hope this helps, let me know if you have any more problems or queries 😊
Donna
Hi Donna
Thank you for your reply. I will definitely make again and follow your proving instructions more carefully. My husband says the bread is fabulous, who cares about the shape !! Flour supplies seem good at present so will stock up !
Pat
Hi Pat, do let us know how you get on or if you have any other queries. I think your husband is quite right…in the end, the taste is everything!! It’s probably very wise to get a few bags of flour in stock then you can have fresh baked bread whenever you fancy! I’ll be doing the same (when I can find some!!)
Donna
Hi, decided to try your crusty bread recipe as a change from my normal one as I was having problems with the kneading in my K Mix . Found it much better adding ingredients in the order you say . The only change was I used a little more oil , about 2 Tbs My bread turned out great but so big ! I think I left the first prove too long , I was used to leaving it 2 hours. It measured over 6 inches high.! It had “mushroomed “ in the 2lb loaf tin I use. Reading previous comments I think I need a better ,higher sided, bread tin . Many thanks for the recipe though , I will definitely use it in the future. Does using different makes of flour make a difference , always use Allison’s or Waitrose own bread flour.
Hi Pat, thanks for your comment. I’m so glad you’ve found us and tried our bread recipe!
Oil is added to bread dough to help with texture. Many recipes don’t use any fat (such as baguettes) and they are often very crusty but quick to start to go stale. Fats can help to create a softer crumb that will keep longer.
However, adding too much fat does have consequences! The fat impedes the development of gluten by coating the gluten strands with flour before they can develop fully, giving a dough that cannot stretch enough to contain the carbon dioxide gas produced by the yeast, before it collapses.
It’s the same as not kneading the bread enough, it will not give the best results.
Some bread doughs do use a lot of olive oil in their recipes such as focaccia but as these are flat breads with little rise, it works perfectly well for that style of bread.
Proving times are also important. If the dough is over proved it won’t expand in the oven and will likely deflate as the gluten structure will be weakened and not able to contain the excessive carbon dioxide. If it’s under proved, the yeast will not have had enough time to produce enough carbon dioxide to make the dough rise.
Different makes of bread flour probably won’t have much of an effect on your finished loaf. Both of the brands you mention are strong bread flours that have high protein. Having said that, you may have read on previous comments that someone has tried to make our recipe with ordinary plain flour with great success! At the time I had not tried to make bread with plain flour (which is lower in protein and unlikely to produce a good gluten structure) but as bread flour has become akin to finding Unicorn eggs in the supermarkets during the pandemic, I did try a loaf with plain flour – basic supermarket plain flour at that as that was all I could lay my hands on! I can now confirm that our recipe made in a stand mixer does work perfectly well when using plain flour! So, although there may be slight flavour enhancements by using Canadian wheat flour favoured by Waitrose, it is perfectly OK to use any flour you wish!
We do prefer a nice tall sided bread tin but they are not imperative to make a good loaf of bread. A well made and shaped dough will have enough structure and surface tension to hold itself in a good shape.
I have made many, many loaves while trying to create an easy, foolproof crusty bread recipe and I’ve found the balance of ingredients work very well together. I hope you give the recipe another try and would love to hear how it turns out!
Donna
I find the liquid measures given in grams to be difficult could you please give the liquid measures in millls ?
Hi Tammy, we give the liquid measurements in grams as that is the most accurate way to measure but if you prefer to use millilitres then simply use the same quantity as in grams as the two measurements are basically the same, so 325 grams is also 325 millilitres.
Thank you so much for this recipe. I treated myself to a stand mixer for my birthday and this was the first thing i made. Ive tried using a bread maker in a previous life but was never happy with the results. This worked perfectly and tasted amazing. The only problem i have now is needing to do 3 times more exercise to work off the calories because once i started in on this loaf there wasn’t much left!
Hi Nadine, thanks so much for taking the time to leave a comment, it really is very much appreciated!
I think a stand mixer is one of the best purchases I ever made and I’m sure your well deserved birthday present to yourself will prove to be a very cherished item that will be invaluable!
I feel very honoured that you chose our bread recipe to be the first thing that you made with it too…and really happy that it has worked so well for you. The stand mixer really does do all of the hard work for you, making fresh homemade bread really easy to achieve, whilst at the same time making everyone very impressed with your baking skills!!
…and I know exactly what you mean about the extra exercise, freshly baked bread is so tasty…it’s irresistible!!
I should probably have read the comments and your helpful responses before embarking on what was only my third attempt to make bread. I kneadn’t (hee hee) have worried. All modesty aside, I’ve just tasted one of the best bits of bread ever! Delicious crust and nice n airy inside. Many thanks for sharing!
Hi Graham, thanks so much for taking the time to leave a comment!
I’m really pleased to hear that our bread recipe has worked so well for you. Making bread can often seem such a daunting prospect but really it’s not as frightening as all that!! We don’t ever buy supermarket bread anymore…once you’ve tasted home baked, nothing compares!!
Can you do this recipe without the tin? If so do I need to change cook times? Thank you!
Hi Nikki, yes you can absolutely make this bread without a tin! Baking time should be about the same but it may be worth checking after about 25 minutes to make sure it’s not browning too much.
Hi, I would like to try this recipe, could you tell me how many fluid ounces equate to 325 grams of water and 15 grams of vegetable oil please?
Thanks
Hi David, 325 grams is 13 fluid ounces and 15 grams is ½ fluid ounce…hope you enjoy the recipe 😊
For the first time ever I made bread. I followed your recipe exactly and wow, success. I had a lovely very well risen, tasty loaf. Thank you.
Hi Jane, I’m so pleased you have used our recipe to make your first ever loaf of bread and that it has worked so well for you! Thanks for taking the time to leave a comment, it is very much appreciated 😊
Have you used this recipe to make buns? What even temp should I use? Thanks.
Hi Val, yes we often make lovely crusty bread rolls using exactly the same recipe! Just divide the dough into the size of rolls you would like (we often do around 100g give or take). If you need a certain number of rolls, weight the dough and divide by the amount of rolls you need.
Bake at the same temperature as a loaf of bread, just for a shorter time.
Hope you enjoy them 😊
Just tried it, delicious!! Thanks for your help – and your recipe!
Excellent! Glad to help 😊
Thank you, that’s the best bread I’ve made for a very long time!
The only (slight) problem I had was that there was too much water and he dough was very sticky. I had to add extra flour, next time I’ll keep a bit of the water back in cast the mix is too dry.
I’m definitely going to try more of your recipes.
Hi Val, thanks so much for your lovely comments 😊 I’m so pleased you have had success with our bread recipe, everyone who makes it seems to be enjoying it!
I have to say I’m surprised that you had a very sticky dough though. It should be soft, as a wetter dough does make better bread but I have tweaked this recipe over a long time to get the best balance between moist & manageable!! Having said that, different flours can have different absorption rates so your plan to hold back slightly with some water is a good idea. I would be interested to hear how you get on!
I’m also very happy to hear that you will be trying out some of our other recipes!
Our most popular ones can be found in the side bar – hope you can find something you like the look of!
I’m hoping to get more recipes and posts written soon 😊
Hi Thrifty Squirrels I have just made your white bread recipe and it is fabulous! I can only get ordinary white flour and only had 400gr of that so made up the rest with spelt flour and gram flour. I have just bought a bright red stand mixer which has a dough hook so your recipe and clear instructions were very helpful. My previous bread making efforts were always a bit hit and miss and I have never used a dough hook before. I am really pleased with how it came out. My husband and I are just about retire so will be reading your tips on living on a budget. I will try out the recipe for cheese and potato scones next. Many thanks Glenis
Hi Glenis, thank you so much for your comments, I’m so pleased to hear that the bread recipe has worked well for you 🙂 It’s the only recipe we use for everyday bread now! I also have a bright red stand mixer that I love – it really takes all of the hard work out of making bread and other bakes 😁.
The cheese & potato scones are very moreish…and if you’re anything like me and always make too many mashed potatoes, this recipe is a real winner for using them up!!
I have followed your recipe to the letter and have used it three times now. Perfect every time . only problem I have it rises too high in a 2lb loaf tin and goes well over the edge, I will try it in a cake tin next time to contain it better. I love the bread and don’t buy any now. since lock down I am making bread cakes German biscuits shortbread and sponges, Turned into quite a baker for a 72 year old male lol Thanks for the great recipe. regards Dave
Hi David, I’m so pleased that the bread recipe is working so well for you! Shop bought bread never has the same appeal once you’ve experienced a proper freshly baked loaf does it?!!
I prefer a higher sided bread tin myself but they can be quite hard to find. Many of the bread tins that are available these days have very low sides. Look out for ‘Farmhouse’ bread tins with sides of about 4″ or so. The tin I use has measurements of approx. 8″ x 4″ x 4″ high. A cake tin will work just as well…just make sure the slices will fit into the toaster if you like your bread toasted 😉
Thanks for this recipe, tried a few stand mixer recipes before and had no luck but this one was brilliant. We’ve been using plain flour because it’s all we have but it still worked well following the exact recipe above! Made a loaf yesterday that went down so well we had to make a second loaf today!
Hi Jon, thanks so much for your lovely comment and I’m so pleased that our bread recipe has worked so well for you too!
It’s really great to hear that you have had so much success with plain flour instead of the strong bread flour that we would normally use. I haven’t tried it yet but with your excellent recommendation, I’m certainly going to give it a go too!
Thanks for sharing you experience with this, I’m sure it will help a lot of people making bread for the first time in these challenging circumstances.
Enjoy your second loaf…you’ll be a busy bread maker from here on in!!
I am very much in the novice baker category and have never made bread before so I was excited to try, and actually use the dough hook on my mixer for once! I didnt have the right shaped tin so used a heavy based circular cake tin instead and the bread is absolutely delicious. Light and fluffy with a crunchy crust. Thank you so much for sharing this recipe.
Hi Vicky, thanks so much for your lovely comments! I’m so pleased that you have taken the plunge and finally used that dough hook and that my recipe was such a success for you!
I’m sure that now you’ve experienced the delights of homemade bread, you will be making it many more times.
I plan to add some more recipes soon that make more use of that dough hook 😀
After having a Kitchenaid for Xmas I have been looking for a simple Bread recipe and was very glad that I found yours.
It couldn’t have been any easier and I really like the fact that you also advise of what speed to set the mixer to a lot of the other recipes I have looked at don’t do this.
The only criticism I have would be could you please give liquid quantities in ML as well as grams.
I found the recipe yesterday and made the bread today so have not had a good chance to check out the rest of your website but look forward to making some more of you recipes.
Hi Bob,
Thanks for your comment, I’m so glad you’re enjoying our bread recipe!
I too have a Kitchenaid. They are really lovely and so useful in the kitchen.
I measure the liquid in grams for our bread recipe as it is so much more accurate and ml and grams are essentially the same but I do see your point and will amend the recipe to show ml as well.
Hope you find more recipes to enjoy, we’re adding more all the time!
Donna
Hi Donna I would just like to say thank you for sharing your recipe for crusty bread I’ve just made it and its come out perfect and tastes delicious it’s the best I’ve ever made so once again thank you
Hi Wendy, thanks so much for your lovely comments. I’m so pleased to hear that the bread recipe has worked so well for you!
This was amazing. Thank you so much. If I were to add seeds to this recipe would I have to change it in any way
Hi Dani, thanks so much for your comment 😊
Adding seeds to your bread is a great idea and a very tasty one! You should be able to add seeds of your choice to the dough without any problems but a little experimentation may be necessary! Raw seeds may have a tendency to draw moisture from the dough and so the texture of your finished loaf my be slightly different but that can be rectified next time by just adding a little extra water to the recipe. You could also toast the seeds first to give a more intense flavour if you wish.
Ideally add the seeds to the bread dough near to the end of the 10 minutes of kneading in the stand mixer as this will give the gluten plenty of time to develop first.
Please do let us know how you get on!
Donna
Hi, I would love to give this bread a go! However I only have Olive oil or butter and whole wheat or plain flour is there a way to adapt the recipe or will it not work?
Thanks so much,
Vicki
Hi Vicki, thanks so much for your question & I’m sorry for the delay in replying – for some reason I didn’t get notified of your comment!
Butter or olive oil would work just as well as the fat content for your bread, flavours may change slightly but I wouldn’t say it would be very noticeable. More concerning would be the lack of strong bread flour as this contains more gluten, which is what allows bread to rise. Some say that a good baker can make bread from plain flour but I have never tried it! Wholemeal can be trickier, even if you have the strong bread flour so for a good loaf of wholemeal with strong flour we usually only allow one rise.
This could work with plain white flour as this is what is recommended when baking bread with gluten free flour.
So, to summarise, if you want to give it a go, make the dough as described, it may need slightly less water so perhaps start with 300g, and knead for longer, maybe 15 minutes in a mixer to give the gluten time to develop.
Then shape the dough and place in a tin (or on a baking tray if you want a round loaf) and leave to rise, then bake.
If you give it a go, I’d love to know how it turns out…I may give it a go myself as I’m running low on bread flour too!!
Donna
Hi there, so I didn’t actually get round to making this until after I managed to get the correct ingredients. It is so super easy to make! I am not a baker but I was shocked when I actually had a loaf come out the oven 😂 the only issue I found was it was a bit too salty for my taste. I’m making it again as I type but have reduced the salt to 6g to see if that’s more to my taste. My 2 kids loved the first loaf tho. I can say enough how easy it was to make! Thanks so much xxx
Hi Vicki, thanks for taking the time to comment 😊
I’m so pleased you have found our bread recipe so easy to use! Being shocked when you found you had actually baked a loaf of bread made us laugh!!
Yes, absolutely change the level of salt to suit your taste but a small word of caution – salt does have a role to play in the structure of the dough. It tightens the gluten structure and adds strength to the dough, enabling it to capture and hold on to the carbon dioxide gases produced by the yeast, which gives the dough a good rise.
Salt also absorbs water from the dough, which in turn slows down the activity of the yeast. If you use less salt you may find that the dough proves quicker as the yeast is acting faster!
Having said all that, I don’t think there will be too much difference – I regularly make bread with 8g salt and it’s absolutely fine but have never gone as low as 6g so I’d be very interested to hear how it turns out!
Good luck!!
Donna
great explanation thanx
Thanks Yvette, you are very welcome!
Hi there i am trying your bread today. I have made a couple if loaves before using my stand mixer. When i poke it to test it, after the first and second prove, the dough always seems to be wet. The same thing happened today with this recipe. It really clings to the bowl whenni try to turn it out. What am i doing wrong ? Thanks
Hi Evelyn, the thing with bread dough is that wetter is better! This recipe should make a soft dough but not overly wet though. Are you weighing all of the ingredients including the water? Sometimes flours can vary in absorption rates too.
Although it may be a little tricky to deal with when you first start making bread, a softer dough will actually make a better loaf in the end. Using a little flour when you turn it out of the bowl will help to stop it sticking to the work surface. It will stick inside the bowl a bit too but you should be able to encourage it all out with the side of your hand or a plastic bowl scrapper. If you have too much trouble then oiling the bowl before putting in the dough for it’s second rise should help.
If it’s still a problem for you, you could cut back on the water a little, perhaps by 10grams or so. If the dough is too tight (with not enough water added) then it will effect how much it rises but this recipe is the one I use to make our bread all the time and with a little practice, it does work perfectly!
Hope you give it another go – let me know how it turns out.
Thanks for this recipe. So easy and the bread turned out perfectly! I didn’t really understand the reshaping instructions for the tin, but just kneaded a bit and shaped it like the tin without doing the folding and sticking. It was ready for the oven after an hour the second time, and it’s come out beautifully. Will definitely be making this again!
Thanks Amy, I’m so pleased that you have enjoyed the recipe and had great results!
I just want to say thank you for a brilliant recipe. I’ve been trying to make a good loaf for months and have had very patchy results….not with this recipe which is so clear and precise. I’ve produced bread which I actually want to eat!
Hi Cait, thanks for taking the time to comment!
I’m so pleased to hear you’ve had good results with our bread recipe!
Baking with yeast can be tricky so we wanted to help others to make really good bread as easily as possible and I’m thrilled that so many, like you, are finally creating great loaves.
Donna
i have produced your loaf as per recipe. I let it rise after 1.5hrs in the tin approx 25mm above the edge. On moving into the oven it dropped to approx 12mm above the edge. After baking it returned to 25mm. I expected it to rise more than that. Did I do anything wrong?
martin
Hi Martin, thanks for your comment and I’m happy to hear you’ve given our bread recipe a go!
From what you say of the dough dropping when you moved it, this sounds like a possible case of overproving, either in the first or second stage or the gluten in the flour hasn’t developed properly.
With overproving, if the dough is left for too long on the first proving then it could run out of steam by the time it’s finished it’s second prove and so will not rise more in the oven.
Times can only be guides as so much depends on the temperatures of the dough and the room temperature. A good way of testing whether your dough has risen enough is to give it a gentle prod with your finger. If the indentation remains in the dough then it has overproved, if it bounces straight back with no sign of an indentation then it is underproved. What we are looking for is the indentation to bounce back half way, this shows the dough is proved correctly.
If you have used a stand mixer to knead the dough for 10 minutes then the gluten should be developed adequately and shouldn’t be the cause of the problem unless of course the flour you have used is low in gluten (eg ordinary plain flour). If you have kneaded by hand you will need to knead for about 15 minutes to be sure of good gluten development.
Shaping the dough is also an important stage. Shaping the dough into a roll creates a little tension so that the dough holds itself together while it rises, rather like a balloon. This could easily be the cause of the issue you have had and can be a little tricky for new bread makers to get right as it doesn’t seem as important as the kneading stage whereas in fact it is equally, if not more important to get right!
Leaving the dough to rise until it’s 25mm above the rim on the tin is pretty much exactly what I do but it can be dependant on what tin you are using so do bear that in mind.
Breadmaking is really easy to start but the more you make it and the more experience you gain, the better it gets!
I hope this reply helps and gives you some pointers for your next loaf but if you have any further questions, please let me know!
Donna 😊
So happy with both the white crusty loaf recipe and the whole meal loaf. Have made both several times and they work perfectly each time which is great for a complete amateur. So thank you very much! Paulina.
Thanks so much Paulina,
I’m so pleased that our bread recipes have been such a success! There’s nothing like the taste of your own homemade bread still warm from the oven – a real treat!!
Donna
Pingback: Elbow Grease this is one cleaning product you must have in your cupboard