
If you have a garden, small or large, urban or out in the wilds of the countryside, chances are you could have a hedgehog visiting during the night. But did you know that our lovely native hedgehog is in dire need of a helping hand?
Their numbers could be down by as much as half and they continue to decline but they are such a useful asset to any garden as they are great at pest controllers!
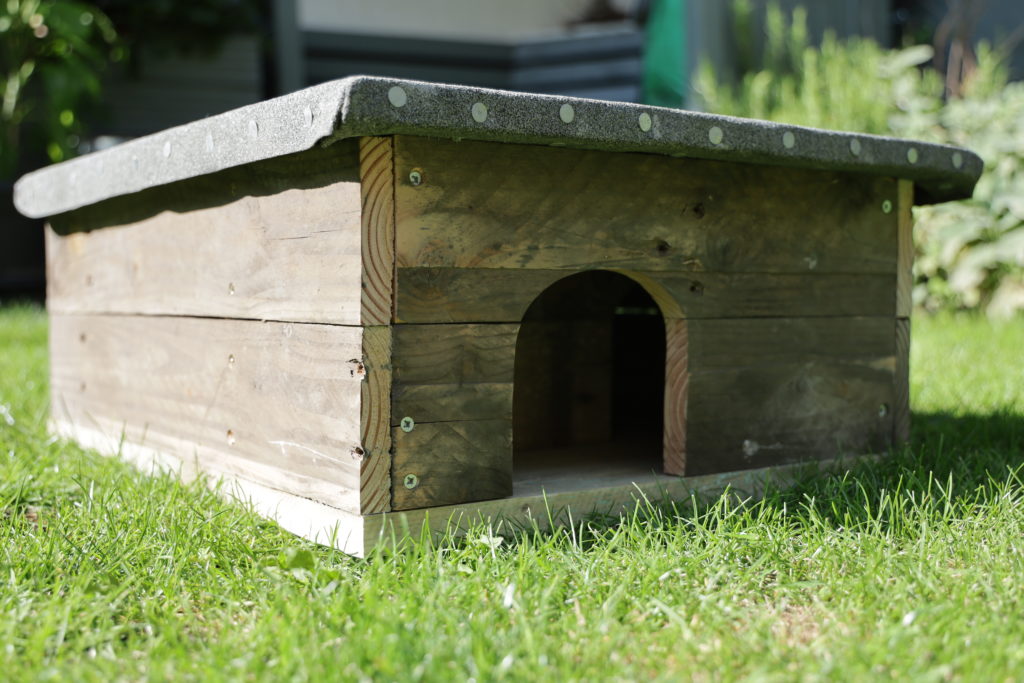
With this in mind we have decided to make some areas of our small ‘new build’ garden wildlife friendly and that includes installing a hedgehog house in the hope that one may decide to move in and help us with slug control (slugs took quite a few young crops in spring this year).
We did look at buying one and there are quite few out there to choose from but some look quite flimsy with no protection from predators while other more substantial wooden ones can cost well over £50 – quite a lot of money for what is basically a wooden box with a lid!
Whenever we have something heavy delivered on pallets (this doesn’t happen very often but earlier in the year we did buy in some good quality vegetable growing topsoil for our small raised beds) we spend a bit of time taking the pallets apart and taking out every nail and staple and store the wood in case we may find a use for it. It’s certainly worth doing if you can find some pallets as it’s free wood for some more ‘rustic’ looking projects!
As we had enough of this wood to make the hedgehog house, we opted to design our own to fit in the space under our arbour at the back of the garden. It is a quiet, sheltered spot that will be protected from the winter weather and the worst of the harsh winds.
There is only one fairly crucial measurement to get right and that is the size of the entrance. We looked at many different manufactured houses as well as other home designed versions to find the ideal size. Most seemed to be around 100 – 125mm (4½” – 5″) but looking at reviews from people who had these designs, there was a little concern that larger hedgehogs may struggle to get through the smaller size gap so we opted for 5″ to be on the safe side!
So, over the course of about 4 hours we designed and built this house for our garden. Hopefully, we will get a visitor soon 🦔
Our Design for a Hedgehog House

We really made this up as we went along but the size and shape should be good for most gardens if you would like to make your own version or you could just take the basic principles and make something more suited to a space you have in your own garden.
Each side and end had to comprise of 2 pieces of wood joined together to give the house enough height.
We also included an internal ‘baffle’ or corridor to give some added protection from predators. It will stop cats or foxes getting to the hedgehog inside!
Wood Cutting List
4 x Side pieces – each one 60cm x 9½cm
4 x end pieces – each one 40cm x 9½cm
2 x baffle pieces – each one 40cm x 9½cm
4 x corner upright pieces – each one 19cm long cut from 2½cm square scrap wood
3 x brace pieces – each one 15cm x 3cm
6 x floor pieces – each one 43½cm x 10cm
5 x roof pieces – each one 64cm x 9cm
2 x roof braces – each one 39cm x 9cm
1 x roofing felt – 75cm x 55cm
roofing felt nails
screws – we used 4.0 x 40 (8 x 1½”) with slightly shorter screws for the brace pieces but depending on the wood you use you may need different sizes. Make sure that when you screw the bits of wood together there are no sharp points emerging from screws that are too long.
Putting It All Together!
I’m going to go through exactly how we put this little hedgehog house together. We could have done some things differently perhaps but this is how we got the house you can see in the photos. The one thing I would change is probably the small mistake right at the beginning!
Instead of joining the long side pieces together and screwing them to the corner posts, I would use the corner posts to join the front and back end pieces. This would negate the need for two brace pieces either side of the opening and we could have moved the entrance hole nearer to the corner.
But, as I say, this is how we did it!
Firstly, take 2 of the long side pieces and lay them flat both together along one long edge (effectively making a piece of wood 60cm x 19cm) and screw a corner piece at either end to join them together. Place the corner pieces in from the edges to match the thickness of your wood. For example, if your wood is 18mm thick then set the corner posts in 18mm in from the short edges as this will leave space for the front pieces to be attached and everything will be perfectly aligned on the outside.
Do exactly the same with the other 2 long side pieces.
Next we joined the side pieces together with the back end pieces to make the start of the box shape. The end pieces don’t need to be joined together first as they can be screwed to the sides one at a time.
Once these are in place we have the start of a box! Now, the front end pieces need to be joined together. Use the 2 brace pieces to join them together but be careful where you place them! Firstly you need to leave room for the corner post then screw the first one in place. Mark out a 125mm hole before screwing the second one in position.
When the wood is joined you can cut out the entrance hole.
Now screw the front end piece to the side pieces and you have the basic shape…it all gets a bit simpler from here!!
The baffle is treated in the same way as the front end pieces but we only used one brace piece as the baffle is secured with screws from the outside and from underneath when the floor has been completed.
The baffle needs to be positioned so that the corridor is 125mm (5″) wide at it’s narrowest point, so measure the distance from the baffle edge to the brace piece.

Next we turned the box over and screwed the floor pieces into position.
Starting at the front we lined up all of the front edges and screwed the first plank in place. As you can see from the photos the boards run from side to side rather than from front to back. It doesn’t really matter which way they run but because of the amount of wood we had and to make best use of it we opted to do it this way – it does give a nice and neat front edge though!
We continued back, butting each plank tightly up to the previous one before screwing it into place.
The last plank was slightly wider than necessary but as it wasn’t going to cause any problems we left it as it was rather than waste time and energy trimming it down!
Finally, the roof.
We laid all of the roof pieces together along their long edges and used the 2 brace pieces to join them together. We placed the brace pieces so that they would sit inside the box and not foul on the edges.

Once it fitted perfectly it was then covered with a piece of roofing felt, which is held in place by roofing felt nails, to keep the rain at bay!

Finally we drill a row of 4 holes in the upper corner at the back of the box for a little added ventilation.
It’s not advised to treat the wood in any way. Hedgehogs have a fantastic sense of smell and will be put off by strong smells.
None of the measurements are crucial, but I have included below a plan of the dimensions of our finished house to give you an idea – it’s not to scale (!) and we did do a little sanding along the way to make sure there were no sharp edges or splinters but it will give you a basic starting point to see how to quickly put a little hedgehog house together.

If you have a go at making your own hedgehog house, I’d love to see the results! You can visit our Facebook page or tag us on Instagram @thethriftysquirrels or #thethriftysquirrels
If you need any further information on how we built this hedgehog house, please leave a comment below 🙂
If you’d rather buy one…
Not everyone has the time or resources to make their own but if you’d still like to give wildlife a helping hand in your garden this year, now is the perfect time to introduce a hedgehog house.
This is one of the best selling ones with great reviews.

Pingback: Biodiversity Project work afternoon – ACE EcoSchool
Hi
Just wanted to let you know that I believed I had a hedgehog in our garden, regularly visiting. Downloaded your hedgehog house plan and built it a couple of weeks ago.
Now have one very happy hedgehog and ‘parents’ (us). After a couple of nights of investigating the HH entered, we put in straw and using a camera identify that is has taken residence!
Absolutely delighted and thank you.
Gordon
That’s great news! Well done on building the hedgehog house – you must have made a super job of it to have a resident move in so quickly 😁👍
Giving wildlife a helping hand is such a nice and satisfying thing to do and even more essential with more and more of their habitat being lost.
We’ll keep our fingers crossed for hoglets for you in the spring 😉
It is worth mentioning that not all pallet wood is the same; the markings on the pallet will tell you if it has been chemically treated or not 🙂 would you treat the outside with animal safe stain or leave it?
Hi Emily,
You have made a very valuable point about not all pallet wood being the same, thank you for mentioning it!
Our hedgehog house is still going strong, we had an over-wintering hedgehog last winter and hopefully we’ll get another this year 😊
We didn’t treat the outside of our hedgehog house with anything as we have sited it under a seating arbour in the back corner of the garden where it is well away from any rain so didn’t feel the need.
Hedgehogs do have a very powerful sense of smell so any products that have a smell to them may put them off so I wouldn’t use any stains or preservatives is it’s possible not to.
Thanks for taking the time to comment, its very much appreciated 😊
Donna
There are plenty of water-based (breathable) fence treatments which are fine if used on the outside. I have always used a couple of treated runners on the base to lift the house above ground and prevent the base getting too damp. The baffle is needed to keep wind chill down and most of my houses have the entrance at the side to create more of a tunnel entrance.
Hi Alan, thanks for that great information 😊👍
Hello, thank you for your hedgehog house design, I have one question, why two baffle pieces when you only use one. Best regards, Chris Hellon.
Hi Chris,
Thanks for your question regarding our hedgehog house design.
When we say 2 baffle pieces we are referring to the two pieces of pallet wood needed to be joined together to make one baffle.
As you will also see on the design that there are 4 pieces to make 2 ends – I hope this makes sense!
The hedgehog house we made is still in use and our resident hedgehog recently made an appearance after his/her winter hibernation – we are keeping our fingers crossed for hoglets this year!
Donna
I saw these instructions ages ago but have only just got around to making the hogs’ winter palace. I followed the basic plan and size and just made a few minor tweaks to the design. I used an old pallet, slightly changed the bracing and used a bit of spare pond liner for the roof covering. Now to see if anyone moves in – they are still visiting the garden on good nights. I’ll post some pics later. Many thanks for the idea!
Hi Mike, that’s great to hear! I’m sure once they find it, a hedgehog will be very grateful for somewhere warm and safe to spend the cold winter months.
We have one using our hedgehog house right now – we were hoping that it was being used for a second litter of youngsters a few weeks back as we saw a hedgehog taking in loads of bedding materials (we left some straw behind the house for it to find!) but haven’t seen any evidence of that yet…they seem to be able to move about in the garden without triggering the wildlife camera!
Good luck, I hope you get a resident very quickly, and well done for making the effort to knock one of these simple houses together. It will make such a difference to our struggling hedgehog population.
…and I’m looking forward to seeing the photos 😁
I saw a video on this page – beef and potatoes in a foil parcel – how do I find this recipe ? Thanks
Hi Sharon, So sorry but I haven’t done a recipe for beef and potatoes in foil…perhaps you saw it on another blog?